A micrometer is a precision instrument used to measure a job, generally within an accuracy of 0.01 mm.
Micrometers used to take the outside measurements are known as outside micrometers.
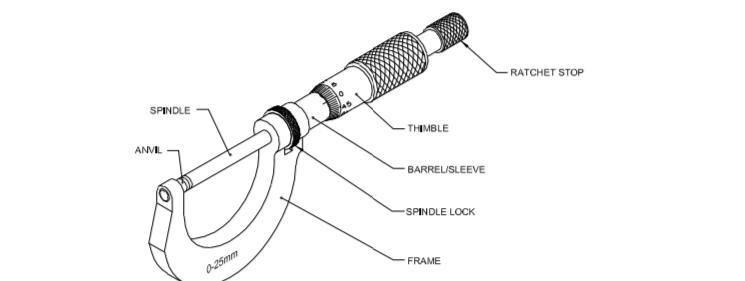
Parts of micrometer
Frame
The frame is made of drop-forged steel or malleable cast iron. All other parts of the micrometer are attached to this.
Barrel/Sleeve
The barrel or sleeve is fixed to the frame. The datum line and graduations are marked on this.
Thimble
On the beveled surface of the thimble also, the graduation is marked. The spindle is attached to this.
Spindle
One end of the spindle is the measuring face. The other end is threaded and passes through a nut. The threaded
mechanism allows for the forward and backward movement of the spindle.
Spindle
One end of the spindle is the measuring face. The other end is threaded and passes through a nut. The threaded
mechanism allows for the forward and backward movement of the spindle.
Spindle lock nut
The spindle lock nut is used to lock the spindle at a desired position.
Ratchet stop
The ratchet stop ensures a uniform pressure between the measuring surfaces.
.working principle of micrometer
The micrometer works on the principle of screw and nut. The longitudinal movement of the spindle during one rotation
is equal to the pitch of the screw. The movement of the spindle to the distance of the pitch or its fractions can be
accurately measured on the barrel and thimble.
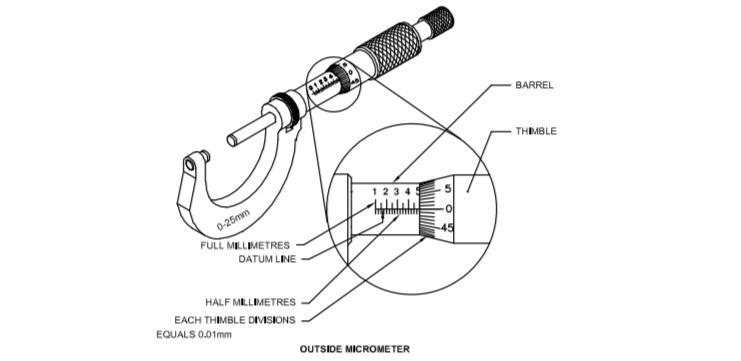
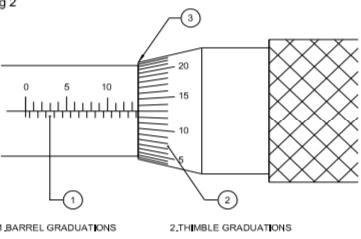
On the barrel a 25 mm long datum line is marked. This line is further graduated to millimeters and half millimeters
(i.e. 1 mm & 0.5 mm). The graduations are numbered as 0, 5, 10, 15, 20 & 25 mm.
The circumference of the bevel edge of the thimble is graduated into 50 divisions and marked 0-5-10-15 …….
45-50 in a clockwise direction.
Graduations
In metric micrometers the pitch of the spindle thread is 0.5 mm.
Thereby, in one rotation of the thimble, the spindle advances by 0.5 mm.
The distance moved by the spindle during one rotation of the thimble is 0.5 mm.
Movement of one division of the thimble = 0.5 x 1/50 = 0.01 mm
Accuracy or least count of a metric outside micrometer is 0.01 mm.
Ranges of outside micrometer :-
Outside micrometers are available in ranges of 0 to 25 mm, 25 to 50 mm, 50 to 75 mm, 75 to 100 mm, 100 to
125 mm and 125 to 150 mm.
For all ranges of micrometers, the graduations marked on barrel is only 0-25 mm
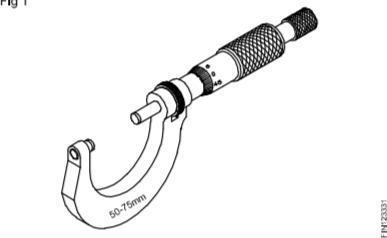
READING OF MICROMETER (How to read a measurement with an outside micrometer)
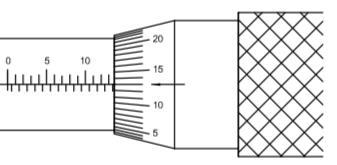
Read the thimble graduations in line with the barrel datum line, 13th div.
First note the minimum range of the outside micrometer. While measuring with a 50 to 75 mm micrometer, note it
as 50 mm.
Then read the barrel graduations. Read the value of the visible lines on the left of the thimble edge.
13.00 mm (Main division reading on barrel)
- 00.50 mm (Sub division reading on barrel) 13.50 mm (Main division + sub – division value)
Next read the thimble graduations.
Multiply this value with 0.01 mm (least count). 13 x 0.01 mm = 0.13 mm.
Add
Minimum range = 50.00 mm
Barrel reading = 13.50 mm
Thimble reading = 00.13 mm
Total = 63.63 mm
The micrometer reading is 63.63 mm.
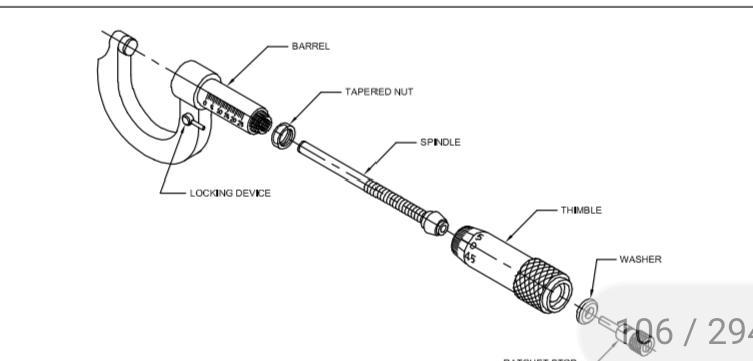
Constructional features of outside micrometer
In order to dismantle and carry out cleaning or adjustment of a micrometer, it is essential to know the functions of its
various parts
Ratchet stop
This is a device fitted on micrometers to ensure uniform pressure between the measuring face of the micrometer
while measuring.

The ratchet stop will slip beyond certain pressure, thus preventing further advancement of the spindle when
excessive pressure is used.
This is mounted on the thimble of the micrometer, and it connects with the spindle when assembled.
Spindle
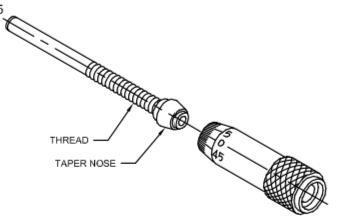
One end of the spindle forms the measuring face. The other end of the spindle is threaded, the tapered nose is fitted on ,the taper nose is very accurately finished for axial alignment and it also permits positioning of the thimble in any required
place during the adjustment of zero error.
The spindle passes through a split internal thread which forms part of the barrel. The outer portion of this split
internal thread has tapered external threads. A taper threaded nut is fitted on this.
Tightening and loosening of this nut enables the spilt internal thread to close or open. This permits the wear
adjustment. in the mating threads.
A special spanner is provided for this purpose,
A special spanner is provided along with the micrometer for fixing and removing the ratchet stop
Thimble
The thimble has a hollow taper to match with the taper nose fitted on the spindle. The locking device provided on the spindle is to arrest the movement of the spindle after taking the measurement

I regard something genuinely interesting about your site so I bookmarked .